Discovery Call to Testing: Our Bubble Development Process
Businesses continually seek to leverage the latest tools to create products and services that meet unique requirements. One of the most exciting developments in this space is the emergence of no-code platforms like Bubble, allowing developers to create software applications without requiring extensive coding knowledge.
At our Bubble agency, we have developed a robust process for developing software applications using Bubble.
In this article, we'll walk you through our approach to development, from the initial discovery call to the final stages of testing.
Why are we explaining our development process?
Finding the right Bubble agency is challenging. Knowing which questions to ask during the discovery process can be confusing, and – most importantly what to expect once the project begins.
And if you already have some experience, you want to ensure that your business is getting the best out of its work with an agency (i.e., you don't want any hidden costs or nasty surprises).
While many Bubble agencies are raving about their portfolio, case studies, budget and timeline, none will explain their development process. It is a black box.
In this article, we aim to be transparent about the different phases of the development process and give you a breakdown of what goes into each step. So you know how we achieve results for our clients!
Related: What is a Bubble Agency
1. Discovery Call
A discovery call is a brief and preliminary meeting. It is a chance for you and us to introduce yourselves, share your goals, needs, and expectations, and see how Bubble can help you achieve them.
A discovery call usually involves you (the client) and us (development team and possibly a project manager). We can do the call over Zoom, Google Meet, or any other video conferencing tool.
The goal of a discovery call is to:
- Get to know each other and learn about the background
- Get a high-level overview of your vision, problem statement, target audience, value proposition, and success criteria
- Identify the main features and functionalities of your app
- Determine if it makes sense to schedule another call - the scoping call - to discuss the details of your project
A discovery call results in a general understanding of how you want to help your audience. You'll also receive an email from us summarising the discussion's key points and proposing the next steps.

The following steps after a discovery call may vary depending on your project's complexity and requirements. Some possible next steps are:
- Signing a contract or an NDA (non-disclosure agreement) if needed
- Scheduling a scoping call to define the scope, timeline, budget, and deliverables of your project
- Creating a wireframe or a mockup of your app design
- Exploring the API documentation if needed
This call sets the stage for the rest of the development process.
2. Scoping Call
A scoping call is a detailed and in-depth meeting. It is a session where we dive deeper into your goals, needs, and expectations and map out how Bubble can help you achieve them.
A scoping call typically involves you (the client) and us (or the development team and possibly a project manager). We can do the call over Zoom, Skype, Google Meet, or any other video conferencing tool. If needed, there may be multiple scoping calls.
The objective of a scoping call is to:
- Understand your requirements in detail, such as the user journeys, the data structure, the workflows, the design preferences, and the integrations
- Identify the main challenges and risks of your project
- Determine the scope, timeline, budget, and deliverables of your project
- Clarify any questions or concerns that you may have about Bubble
The outcome of a scoping call is a clear and mutual agreement on what you want to build with Bubble and how you want to build it.

The next steps are:
- Sharing a preliminary proposal detailing the timeline, budget, milestones and deliverables
- Reviewing and approving the proposal document
- Creating a wireframe or a mockup of your app design
A scoping call is an important part of any successful Bubble development process. It helps you align the scope and expectations of your project.
3. User Stories
The next step is user stories.
User stories are short and simple descriptions of what a user wants to do or achieve with your product. They are written from the user's perspective and focus on the value or benefit of using your product. They help us prioritise and plan the development based on what matters most to your users.
To write a good user story, we follow some guidelines:
- Use a standard format: As a < type of user >, I want to < some goal > so that < some reason >.
- Be specific and concise: We avoid vague or ambiguous terms and focus on the essential details.
- Include acceptance criteria: We define how you will know when the user story is done and meets the user's expectations.
- Use personas: We use realistic and representative examples of your target users to make your user stories more relatable and empathetic.
Here are some examples of user stories for a blog platform:
- As a blogger, I want to create an account so that I can publish my posts online.
- As a reader, I want to comment on blog posts so that I can share my feedback and opinions with other readers and bloggers.
- As an editor, I want to review and approve blog posts before they go live so that I can ensure quality and consistency.
User stories differ from product features because they focus on the user's problem or need rather than the solution or functionality. Product features describe what the product does or how it works, while user stories describe why the product exists or who it serves.
- Product feature: The blog platform has a rich text editor that supports formatting, images, links, etc.
- User story: As a blogger, I want to format my posts easily so that I can make them more attractive and engaging for my readers.
User stories help us break down complex projects into manageable chunks that we can deliver incrementally. By writing clear and valuable user stories, we can ensure that we build products that solve real problems for real people.
User Story Maps
We use a technique called user story mapping to organise our user stories better.
User story mapping is a visualisation of a customer's journey with our product from beginning to end. It includes all the tasks they'd typically complete during that journey.
User story mapping helps us identify how users experience our product and what efforts will lead to the best outcomes for them. It also helps us decide what is most important, organise work into releases (delivering a new customer experience), and de-prioritise work with less user value.
To create a user story map, we follow these steps:
- Identify our personas: We define who our target users are based on their goals, needs, behaviours, pain points etc.
- Define our backbone: We list all the high-level activities (also called Epics) that our personas would perform with our product chronologically from left to right.
- Break down into tasks: We add details by breaking each activity into smaller tasks (Stories) representing specific actions or steps within each Epic. We arrange them vertically under each Epic according to priority (higher priority at the top).
- Slice into releases: We group related Stories into horizontal pieces (also called Releases) based on their value proposition.
Here is an example of a partial user story map for a platform to host and organise events.
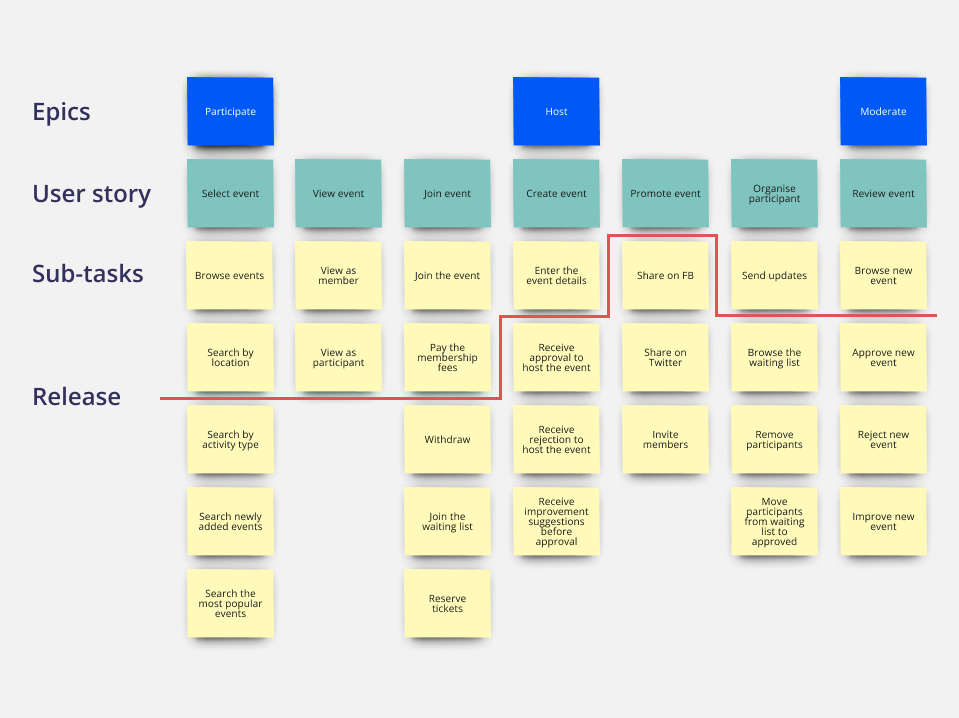
User story mapping helps us create a usable module by ensuring that each release delivers a complete customer experience rather than isolated features or tasks. It also helps us only allocate tasks to frontend or backend teams if we consider how they fit into the overall customer journey.
4. Wireframes
A wireframe is a visual representation of your app design. It shows the layout, structure, and hierarchy of the elements on each page of your app. It also indicates the navigation and functionality and visualises the user journey.
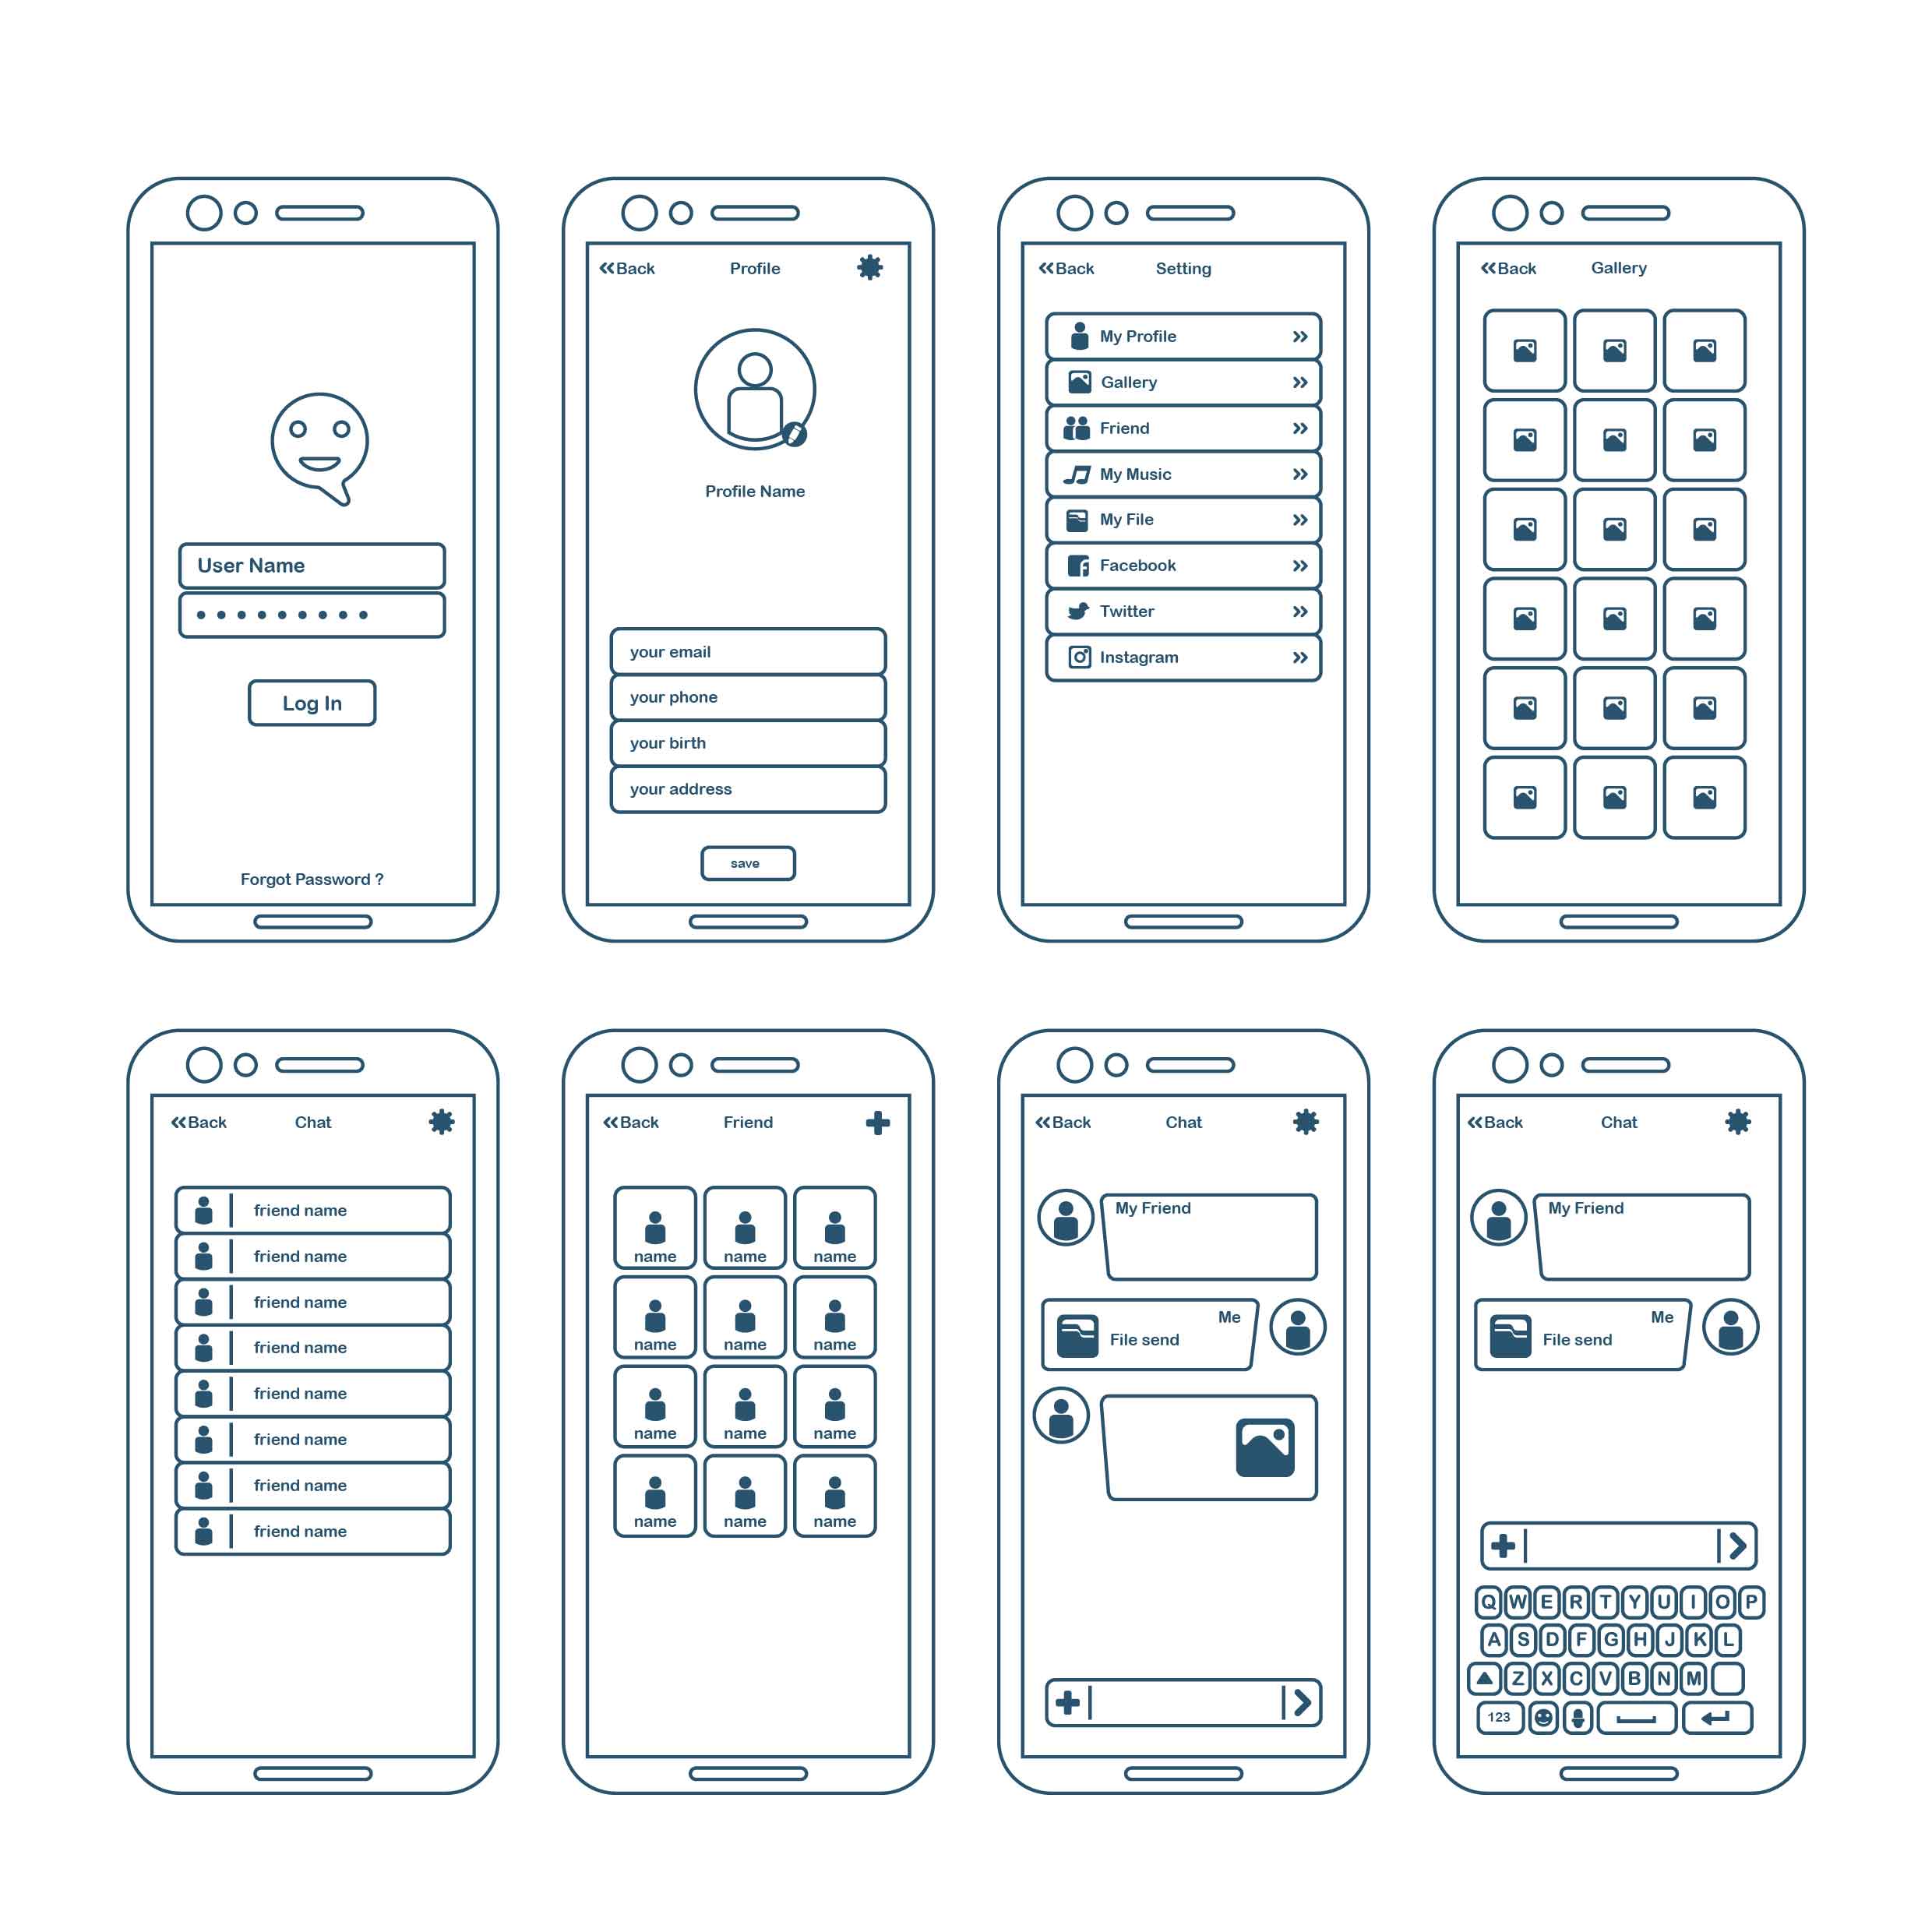
We use Balsamiq or Miro for creating the wireframes.
A wireframe should be:
- Rough: A wireframe is not meant to be a final or polished design. It is intended to be a sketch or a blueprint that captures the essence of your app design. We don't consider colours, fonts, images, or other details.
- Bounded: A wireframe should define the scope and boundaries of your app design. It should show what features and functionalities are included and excluded from your app. It should also show how each page relates to the other and how users can navigate them.
- Open: A wireframe should allow for flexibility and creativity. It should not limit us to a fixed or rigid design. It should encourage us to explore different options, experiment with solutions, and iterate based on feedback.
Some best practices for creating wireframes are:
- Start with pen and paper: Before using any digital tool, we often start with pen and paper. It lets us quickly sketch our ideas without being distracted by technical details or constraints.
- Use simple shapes and symbols: To keep your wireframes simple and clear, we use basic shapes and symbols to represent the elements on each page. For example, we use rectangles for buttons or text fields, circles for icons or radio buttons, lines for separators or borders, etc.
- Use labels and annotations: To make your wireframes more understandable and informative, we use labels and annotations to describe the elements on each page. For example, we use annotations to explain the functionality or interaction of the elements, etc.
- Use placeholders for content: To avoid getting bogged down by content details at this stage, we use placeholders for content such as text or images—for example, lorem ipsum text for paragraphs or headings.
- Use examples and references: To inspire you, we attach examples and references from other apps or websites that have similar features or functionalities to yours. For instance, if your app needs a calendar view, we'll reference how Google Calendar or Outlook Calendar do it.
- Use feedback and testing: To validate and improve your app design, we use input and testing from potential users or stakeholders.
- Use iterations and revisions: We iterate and revise the wireframes based on feedback and testing to refine and finalise your app design.
5. Final proposal
Once we have the User Stories and the Wireframes mapped out, we know the project in detail. We can now share a binding proposal with you with everything mapped out — timeline, budget, milestones and scope of work.
6. High Fidelity Designs
High-fidelity designs are detailed and realistic representations of how your product will look and feel when finished. They include colours, fonts, icons, images and interactions.
We use Figma as our design tool because it's easy to use, collaborative, and powerful. We can also share our designs with your team and stakeholders for feedback and approval.
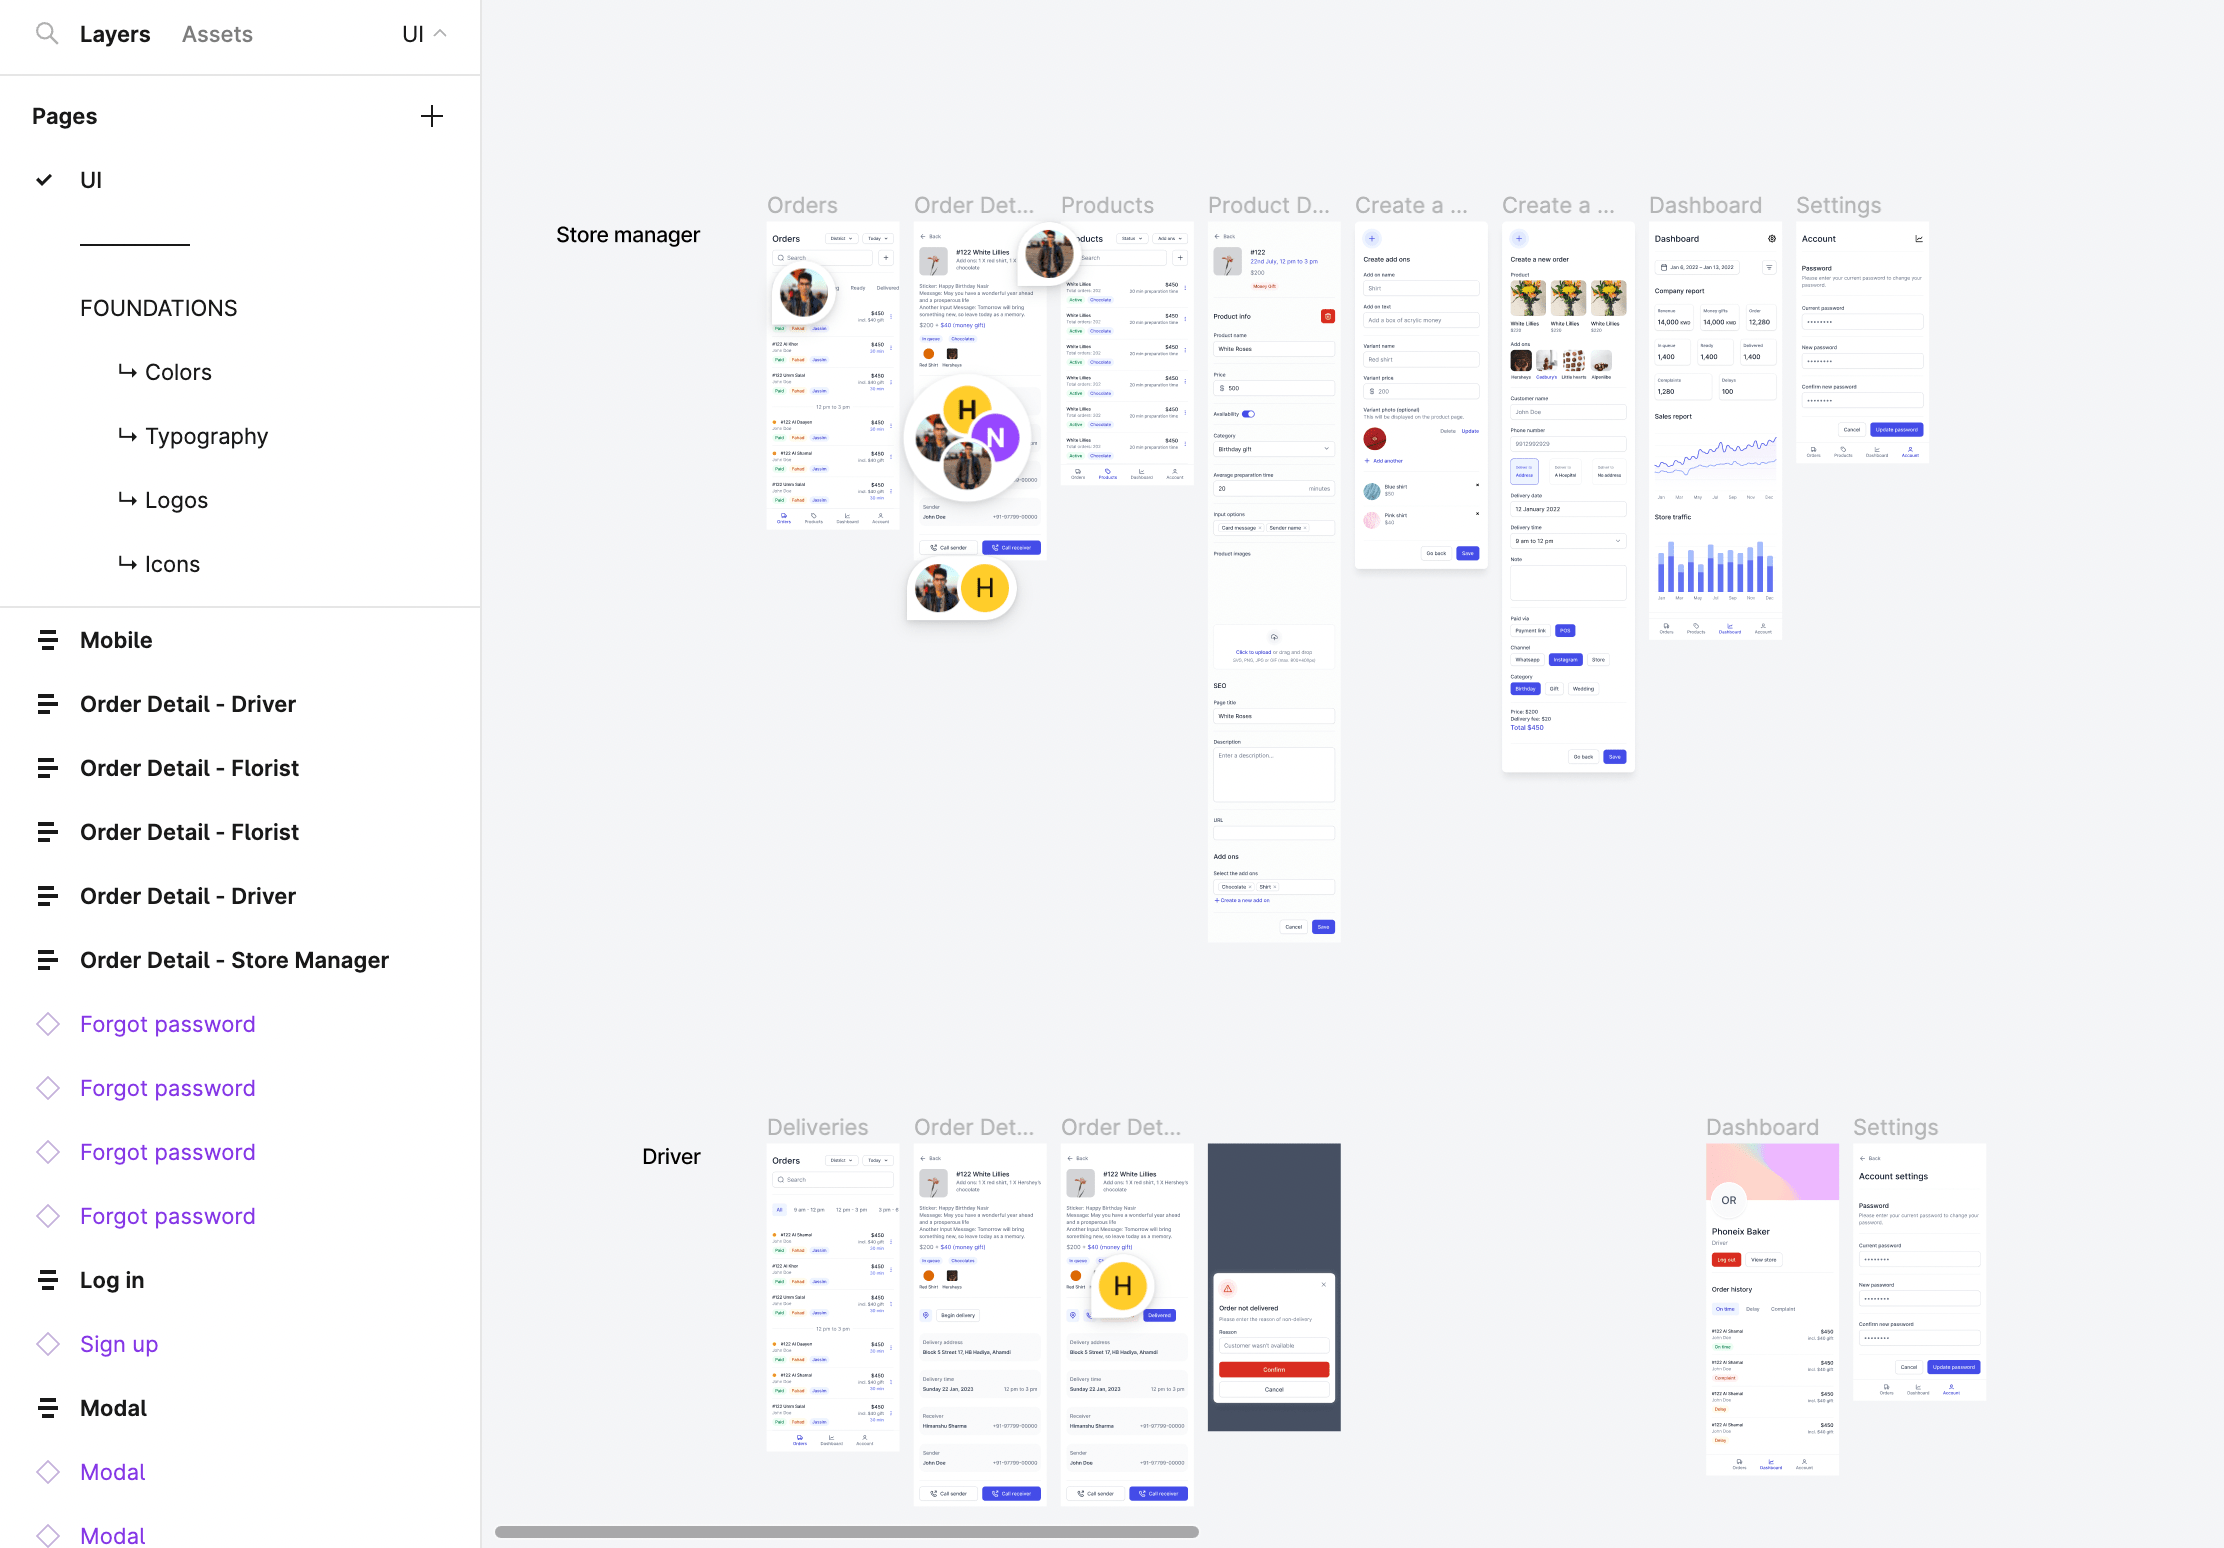
To create high-fidelity designs in Figma, we follow these steps:
- Use user stories and wireframes as a foundation: We use user stories to guide what features and functions we need to design. We also use the wireframes as a base for our layouts and structure.
- Apply visual design elements: We define and apply common visual design elements such as colour palette, typography, iconography, spacing etc. We use a design system for most of our projects.
- Test and iterate: We share our designs with you to show how the product will work. Based on your feedback, we will make changes to the designs.
Since we are building an MVP (minimum viable product), we focus more on function over form. This means we prioritise designing features that deliver value to our users over features that are nice to have but optional. This does not mean that our UI looks like it is from the 2000s. It will be an aesthetically pleasing design, but it won't win any awards.
7. Development
After we have finalised the user stories, wireframes, and high-fidelity designs, we are ready to start the actual development of the MVP. This is where we turn your vision into a functional web app using Bubble, a no-code platform that lets us build apps without writing code.
We use Trello to track each feature's user stories and acceptance criteria. Trello is a tool that allows us to create boards with lists and cards that represent different tasks and stages of the development process. We can also attach files, comments, checklists, and estimates to each card.
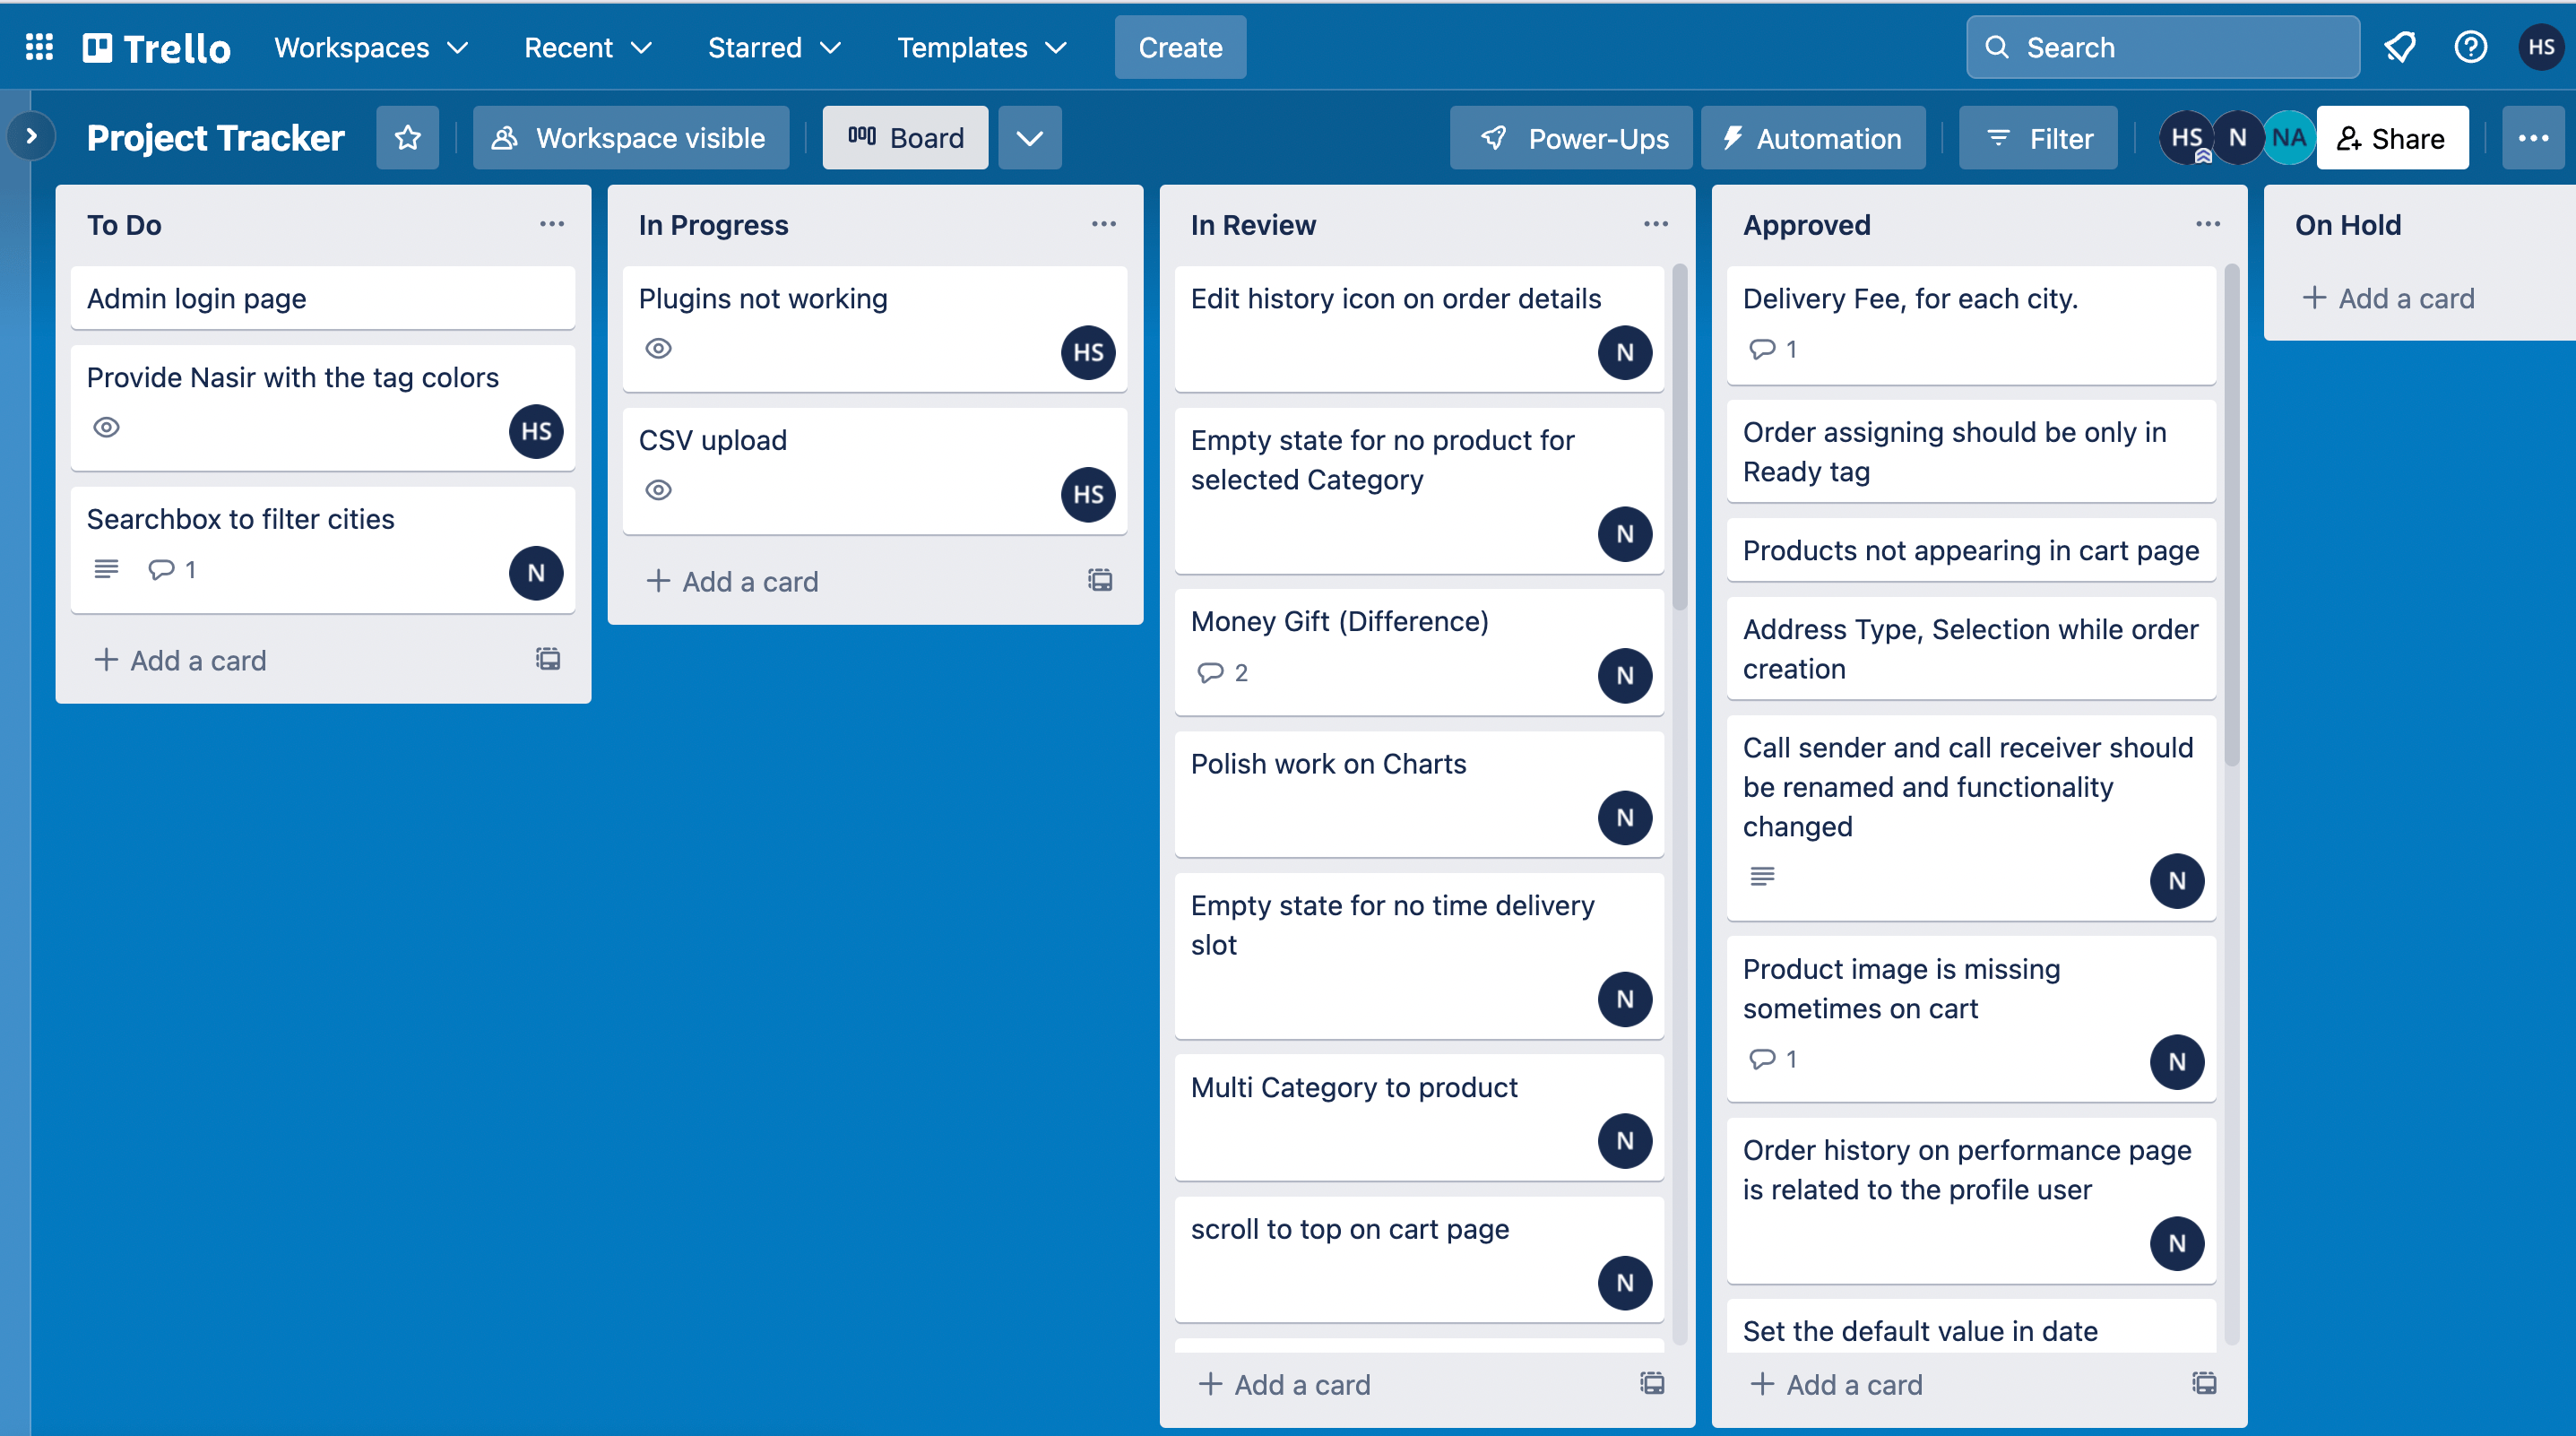
We break down the whole project into multiple sprints (usually one or two weeks), focusing on delivering features that add value to the app. The sprints are made up of a mixture of epics combined together — so it's not that we'll complete design, then workflow, no.
Each sprint tackles a specific app module, so we can keep our focus sharp and drive results faster. For example, we might devote a sprint to the landing page, sign-up process, and user profile page.
Each sprint's user stories and acceptance criteria are added to the Trello board. As the development progresses, we update the Trello board — so clients have visibility.
No successful software development can occur in radio silence. For all communication, we use Slack to discuss doubts and other questions. It is much better than communicating via email or video calls.
Once an epic is completed, we move to the next step for Testing.
8. Testing
Testing is a process that checks for defects and errors in the software product or application. Testing is not the same as QA, which is broader and focuses on improving the processes and practices throughout the software development lifecycle.
Testing is a reactive and corrective approach that focuses on finding and fixing the bugs and issues in the software.
One of the critical aspects of testing is using the acceptance criteria for each user story. The acceptance criteria must be met for the user story to be considered done and ready for delivery. They help to clarify the expectations and requirements, as well as to guide us in our work.

The testing team uses the acceptance criteria to perform different tests on each user story. Some of the common types of tests are:
- Unit testing: Validating that each software unit performs as expected. A unit is the smallest testable component of an application.
- Functional testing: Checking functions by emulating business scenarios, based on functional requirements.
- Regression testing: Checking whether new features break or degrade functionality.
If a user story passes all the tests, it is marked as done and moved to the next step. If a user story fails any test, it is returned to the developer for fixing.
Once a sprint is completed, we ask you to verify the epics (large features of multiple user stories) for acceptance. You can either accept or reject an epic based on their satisfaction. If an epic is accepted, it is considered part of the MVP (minimum viable product). If an epic is rejected, it is sent back to the development team for improvement.
The testing process ensures that the MVP is delivered with minimum defects and errors and meets your needs and expectations. It also helps improve the software's quality, reliability, and performance.
9. Handover
Once all the epics and user stories have been tested, the MVP is marked as completed. It can now be handed over. During the handover, there are 4 things to do:
- Transfer of app ownership: The Bubble app is transferred to your Bubble account and set up the billing.
- App connected to the domain: The app can be connected to a custom domain. The DNS changes are simple and take less than 10 mins to complete. Sometimes, we connect the app to a domain earlier in development.
- Training: Our Bubble developer will give you a walkthrough of the app — database structure and page layout. We will not ask you to maintain the app, but Bubble is easy to understand at a high level, even for non-technical people. And our clients appreciate it when they know how the app works under the hood.
- Documentation: We document the app and share the documentation with you. It includes the workflows, database structure, page structure and how to make minor changes to the website's static content. We use Notion or Google Docs for this.
10. Maintenance
Maintenance is the last stage of our development process.
Maintenance ensures that the software product or application continues functioning correctly and efficiently after being handed over and deployed to the end users. Maintenance also involves updating and improving the software product or application to meet the changing needs and expectations.
We offer maintenance services in two ways: on-demand or retainer.
On-demand maintenance means providing maintenance services whenever you request or require them. We charge a fixed hourly rate for on-demand maintenance services.
Retainer maintenance means we provide maintenance services regularly, such as monthly, quarterly, or yearly. We charge a fixed monthly fee for retainer maintenance services. You can choose the type and level of maintenance services that suit your needs and budget.
How do you handle scope changes throughout the development process?
Scope changes are inevitable in any project. They can arise for various reasons and can impact the project's timeline, budget, quality, and deliverables.
We understand that scope changes are sometimes necessary and unavoidable. However, we also try to minimise them with the user story and wireframing step as much as possible.
We review the user stories and wireframes with you and get your feedback and approval before moving on to the development stage. We also document the scope of work clearly and explicitly in a contract or agreement that outlines the new deliverables, timelines, costs, and responsibilities. It ensures we are on the same page regarding the project's scope.
However, we also acknowledge that some scope change is expected and unavoidable during the development process. We follow these steps to manage scope changes:
- We evaluate any scope change request and consider the change's feasibility, necessity, and value.
- We discuss the scope change request — the pros and cons of the change and try to reach a mutually agreeable solution. We also propose alternative options that can solve the needs.
- We document any scope change request and its resolution in a formal change order or amendment that modifies the original contract or agreement. We also update the project plan, schedule, budget, and deliverables accordingly.
Related: How to collaborate with a Bubble agency
What level of involvement do clients have in the development process?
The level of involvement is high till the wireframe stage. Until then, we need your input to understand what we need to build and if we're on the right path.
Most software development projects fail not because of budget, timeline or technical challenges but because of missed expectations.
It is not easy to translate what you have in mind to paper. More difficult when you have to explain it to someone else. With the user stories and wireframes, we attempt to understand the vision you have in mind.
Once we understand, you can step back, and we can start developing the product.
Want software that moves the needle?
We’ve helped ops teams, marketing leads, and SaaS founders build software that scales.


